Tuesday, April 24, 2012

Busy in the garden...

Not that it was a terribly long winter or anything, but it's great to see my garden thriving once again... everything is coming out of it's winter slumber!

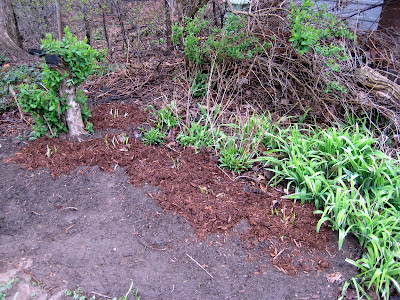
here is the "new" garden space that was cleared last fall when I cut back the honeysuckle and weeds... I have also divided and transplanted  at least a half dozen purple coneflowers (Echinacea purpurea) from another part of the garden... I intermingled them in with the Day Lily (Hemerocallis) and foxglove (Digitalis purpurea)


transplanted hostas from the revamped front foundation garden...


I have decided to leave the sugar maple (Acer saccharum) sapling that grew in the middle of the garden... If I don't decide to keep it as a nourished tree for the property, at least I can let it grow a little more so that the wood becomes useful for something... 

the same goes for the unkown speicies of oak tree 10ft away... 

another rose bush was removed  from this garden... the buds on the virginia creeper (Parthenocissus quinquefolia) are starting to swell...

the front foundation garden has been gutted of random flowers, and replaced by a hedge row of another Ontario native shrub called fragrant sumac (Rhus aromatica)... these grow relatively low, flower early and have great fall interest... it may take awhile to fill in this space, but it should be worth waiting for... a single forsythia bush (Forsythia × intermedia 'Nothern Gold) was also planted next to the front door to help give the front yard a little extra colour in the early spring...

the xeriscape garden is looking promising... besides the early weeds, the black eyed susan (Rudbekia fulgida 'Goldsurm'), and purple coneflowers (Echinacea purpurea) have sprouted, but only time will tell if the ornamental and native grasses survived the winter...

both green coneflowers (Rudbeckia nitida  'Herbstonne' or 'Autumn Sun') reemerged from the frosty ground... to fill in the garden, I divided and transplanted most of the tall coreopsis (Coreopsis tripteris) from the back garden here so they flourish in the full sun... the new Dense Blazing Star (Liatris spicata) planted in the fall has yet to show itself...


Sunday, April 22, 2012

Finally done!

It only took 21 frickin days to finally finish my seedling bench, but its done!
It's kind of fitting to, it being Earth Day and all...

(Please excuse the bad lighting in the photos... 
its in a dark part of the house)
here is the finished product with lights and seedling trays already planted... it has three growing shelves and can accommodate 6 conventional seedling trays...

I used 3/4" douglas fir plywood for the top, bottom and shelves, and used the KREG joinery to attach them to the 2x4 frame...

the lighting on each shelf is made up of two banks of fluorescent shop fixtures, for a total of four 40W T12 Daylight bulbs... connected by a 2x2, each is hanging from hooks and chains that allow one to easily adjust the height... very low cost and very effective...

seedling of an Obedient Plant (Physostegia virginiana 'White Crown')


seedlings of a Purple Coneflower (Echinacea purpurea)

Construction Costs:
2x4s (x 8) @ $20
4x8 sheet 3/4" douglas fir plywood (x 1) @ $30
box of 1 1/4" KREG screws (x 1) @ $5
Shop lights (x 4) @ $60
Daylight bulbs (x 8) @ $36
Small hooks (x 8) @ $3
Small chain @ $2
screw-type leveling legs (x 4) @ $5

Total cost, depending on current supplies: $161

(I only needed to buy the 2x4s, screws and plywood this year, as the rest I had already )

This cost is pretty good when you compare it to similar quality store bought versions such as this one from Lee Valley for $689, plus $200 for the Verilux bulbs...

My design may not look as nice, but is probably a whole lot sturdier... I have had a lot of success with these daylight bulbs (6500k) (at least for seedlings), but I have never used the Verilux bulbs, so I cannot compare results... but at six times the price, for most people this would be cost prohibitive... and for what benefit I am not sure...

It's good to get my seedling bench up and running again, and for as little cost as possible is just a bonus!


Sunday, April 1, 2012

Seedling Bench

Its spring and I am getting the itch to get things rolling for this growing season!


After taking a 2 year hiatus from starting plants from seed, I am going full force, and what better to mark the occasion than with a brand new, hand built seedling bench!


tools to cut the front rails, side rails, and legs...

a KREG pocket hole jig to serve as the joinery method (I really love this system and I use it extensively in my other passion, woodworking)...

special KREG drill bit to make the pocket holes...

the drilled holes...

all the pieces after drilling 2 holes on each end of the rails...

this will be a 3 tier seedling bench and this is one side assembled with the screws...

almost fully assembled, but I forgot how to add so I only had enough lumber for 6 front and side rails and I needed 8, so this is it until I can get more tomorrow...